Design a paywall
Create a paywall, lay out its screens in the designer and preview the whole flow.
The designer is Studio's canvas for paywalls and onboarding flows. You lay out screens, show store prices, wire up buttons and preview the result, without code. Edits save as you make them, and several people can work on the same paywall at once.
Paywalls are in early access. Ask us on Discord, or email support@voidhash.com on a paid plan, to turn them on for your team.
Create a paywall
- Open Paywalls in the sidebar and click New paywall.
- Enter a Paywall name of 3–32 characters.
- If onboarding flows are on for your team, choose the Kind: Paywall, or Onboarding flow for a flow that continues after a purchase. See Onboarding flows.
- Check the Slug, filled in from the name: 3–32 lowercase letters, numbers and hyphens. Reports refer to the paywall by its slug, so it can't change later.
- Click Create paywall. The paywall appears in the list.
- Click it to open its page, then click Edit paywall. The designer opens in a new tab. Edit in the paywall's menu on the list opens it directly.
Every paywall starts with one empty screen. To reuse a screen, select it and press ⌘D, or right-click it and choose Duplicate.
Members can open the designer and preview, but it's read-only for them; changing a paywall needs an admin or the owner.
Find your way around
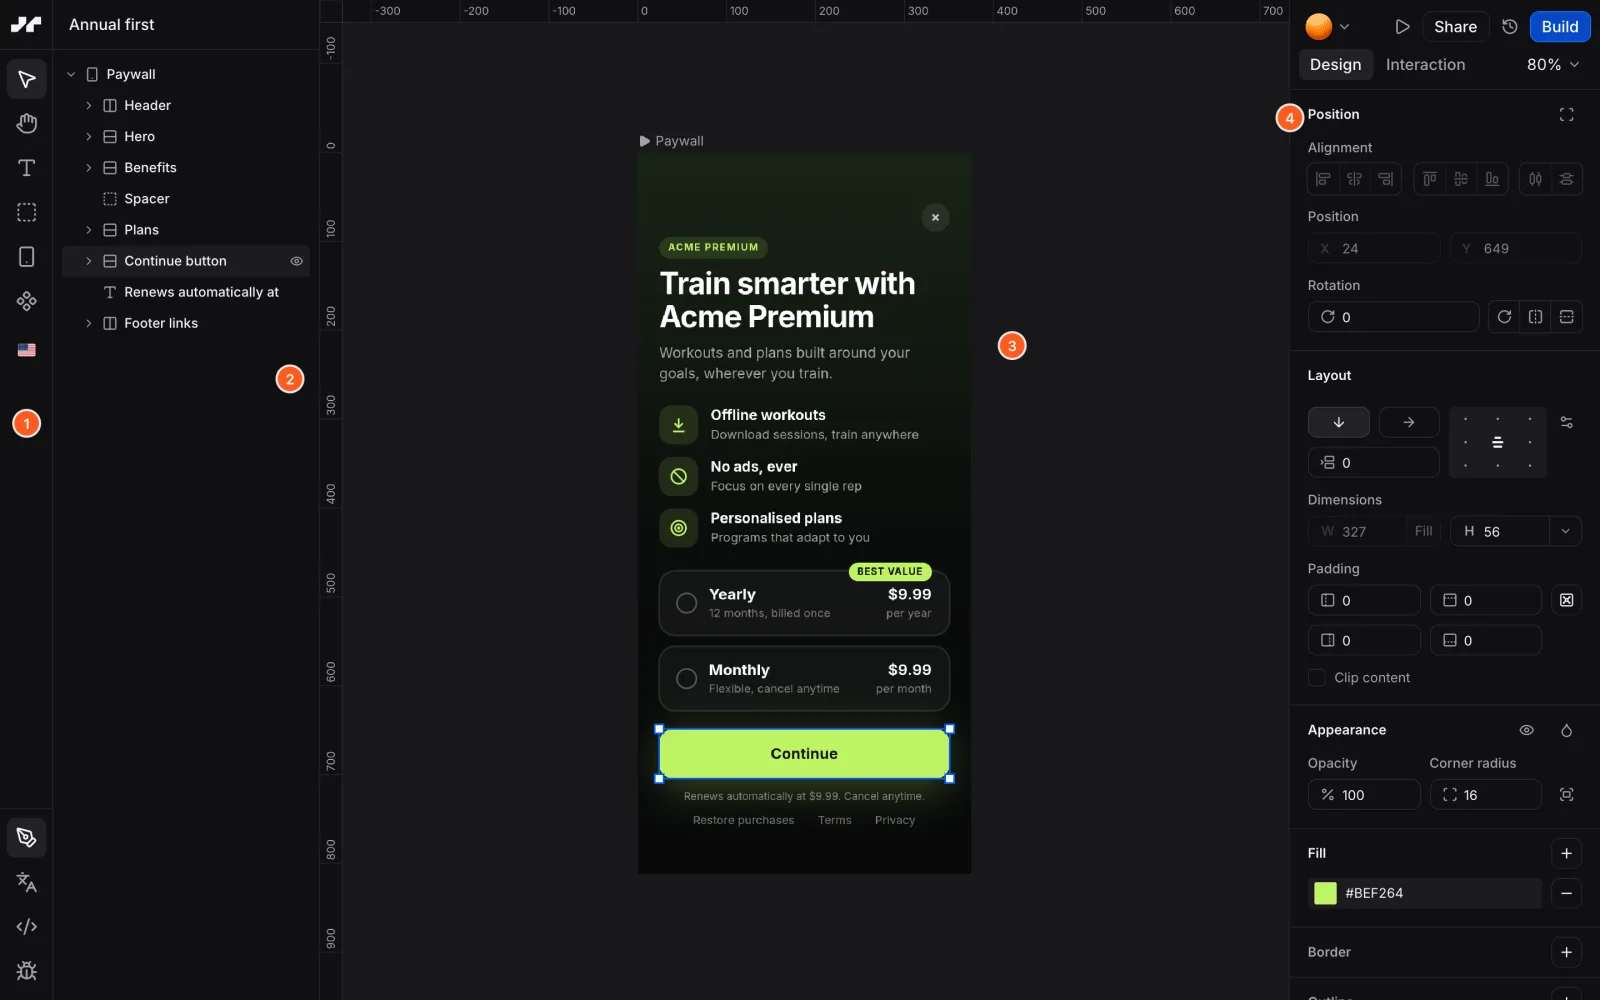 The designer's four areas, numbered as in the text below
The designer has four areas: (1) the rail with modes and tools, (2) the layers of every screen, (3) the canvas and (4) the properties of what you select. Build is at the top right.
The rail switches between three modes:
| Mode | What you do there |
|---|---|
| Design | Lay out screens and layers, and wire up buttons. |
| Translate | Add languages and translate text. See Translate a paywall. |
| Code | Browse the custom components the paywall can use. See Custom components. |
In Design mode the rail also holds the tools:
| Tool | Shortcut | Use it to |
|---|---|---|
| Select | V | Select and move layers. |
| Hand | H, or hold Space | Pan the canvas. |
| Text | T | Add a text layer. |
| View | F | Add a view, a container for other layers. |
| Screen | S | Place a new screen. |
The properties panel has two tabs: Design for appearance, and Interaction for variables, states, screen presentation and buttons. Its sections change with your selection, such as Position, Layout, Fill, Border, Effects and Typography. The main menu at the top left holds Undo (⌘Z), Redo (⌘⇧Z), alignment, ordering and zoom.
Add screens
Each screen is a 375 × 812 point frame. Add one with the Screen tool, or duplicate one. To rename it, double-click its label on the canvas.
The flow begins on the screen with a play icon (▶) before its name. To change it, right-click another screen and choose Set as start screen.
To choose how a screen appears, select it and open Interaction → Presentation:
- Push slides it onto the current screens, with a Transition of Slide, Fade or None, and optionally Swipe back.
- Modal, Sheet and Dialog open it over the flow. Sheets take a Height (Fit content, Half or Full). Modals and sheets can close with Swipe down to dismiss, sheets and dialogs with Tap outside to dismiss.
- The start screen's presentation doesn't apply, since the flow opens on it.
Lay out content
Build each screen from text, views, images and components:
- Text: set the font, size and style in Typography. To use your brand font, see Fonts and images.
- Views: group layers and arrange them in rows or columns with Layout.
- Images: in a layer's Fill, choose an image from the project's library, for example as a background.
- Components: click All components in the rail, or press ⌘J, to insert one, such as a scroll view or a component your developers wrote.
Then add prices and make the buttons work: see Show prices and wire up buttons. Before you build, check Design for every device, since screens resize on real phones and tablets.
Preview
Click Preview (the play button) to run the whole flow from its start screen in an iPhone-sized frame.
- Purchases and restores are simulated and always succeed, so you can walk every path.
- Switch languages from the preview to check translations.
- The Events panel lists what the flow reports to your app, such as how it finished.
Preview needs WebGPU, a browser graphics feature; without it Studio shows Preview unavailable. Use a recent Chrome, Edge, Safari or Firefox with WebGPU on. To try the paywall on a phone, build it and scan its Preview QR code; see Try a build on a device.
Use custom components
Code mode lists the custom components a paywall can use, grouped as Project, Installed and, while a developer works on one, Local. Select one to preview it, switch its preview State, and see where this paywall uses it under In this paywall. To add your team's components to the project, see Paywall components.
Rename, archive, restore or delete a paywall
Paywalls has the tabs All, Active, Inactive and Archived. Inactive lists nothing yet: a paywall is either active or archived. Open a paywall's menu (⋯ on its card or row) and choose:
- Rename: changes its name. The slug stays.
- Archive: moves it to the Archived tab, out of the default Active list. It stays editable, and locations and A/B tests that show it keep showing it. To restore it, open it on the Archived or All tab and choose Restore in the same menu.
- Delete: removes it for good, after you confirm with Delete paywall. Locations and A/B test variants that showed it then show nothing, and the app shows its own fallback screen.
To stop showing a paywall, end its placements first; archive rather than delete one you may want back. These actions need an admin or the owner; for a Member they end in an error such as "Failed to archive paywall".
If something's off
- No Paywalls item in the sidebar: paywalls are in early access and not yet on for your team.
- Preview unavailable: your browser lacks WebGPU. Try a recent Chrome, Edge, Safari or Firefox with WebGPU on.
- Tools are grayed out and nothing can be edited: the designer is read-only for Members.
- Someone else's changes appear: that's expected. Edits from everyone save live.
- A paywall is missing from the list: it may be archived. Open the Archived or All tab.
- A component is missing from All components: install it first; see Paywall components.
Next steps
Still stuck? Check Troubleshooting, ask us on Discord, or email support@voidhash.com on a paid plan.
Something wrong or missing on this page? Tell us by email or on Discord.